Loading...
This website provides documentation for administrators of 0th Root Secure Network — 0SNet. To know about the product, kindly visit our product website.
Getting Started
0th Root Secure Network — 0SNet works at the domain level and all subdomains of the chosen domain. For example, if you choose a domain
example.com then 0SNet will secure all subdomains of example.com ie.,
*.example.com. Ideally, a third level domain is chosen, such as
corp.example.com to secure
*.corp.example.com.
1. Network Firewall
It is important that whichever host you setup 0SNet on, only that host has access to the protected servers and configured applications.
2. Email Address
An administrator email address need to be specified at the time of configuration. This is the email address which will receive the password protected certificate. Only by using the certificate, can 0SNet be accessed. However, 0SNet can be reconfigured, if there were any mistakes made.
3. Operating System
The server hosting 0SNet should be capable of running Apache HTTP server (2.4.3+). Currently, RHEL 7 and its derivatives are supported, such as CentOS 7.
If you're on AWS or GCP or Azure, you can use our public
AMI or
Custom Image or
Azure Compute Gallery
to launch a new instance, it comes with 0SNet pre-installed.
Installation
This section will help you through the process of installing 0SNet on your server. Please read Getting Started and have the domain information, administrator email, and the server details ready.
And, open ports 80 (HTTP) and 443 (HTTPS) on the server for 0SNet to work.
| Manual |
AWS |
GCP |
AZURE |
1. Platform setup
Run the following command and set SELinux to disabled,
sudo sed -i "s/^SELINUX=.*$/SELINUX=disabled/" /etc/selinux/config
Restart the server,
sudo systemctl reboot
Once the server is up, run the following commands to start 0SNet server on boot,
sudo chmod +x /etc/rc.d/rc.local
sudo bash -c 'echo "0snet --start" >> /etc/rc.d/rc.local'
2. Pre-requisites
Install Apache HTTP server, the SSL module and the required tools, as follows,
sudo yum install httpd mod_ssl wget bind-utils cronie lsof rsync
Ensure that default configuration of Apache HTTP server is not used,
sudo systemctl stop httpd.service
sudo systemctl disable httpd.service
sudo systemctl mask httpd.service
Open ports 80 and 443,
sudo firewall-cmd --permanent --zone=public --add-port=80/tcp
sudo firewall-cmd --permanent --zone=public --add-port=443/tcp
sudo firewall-cmd --reload
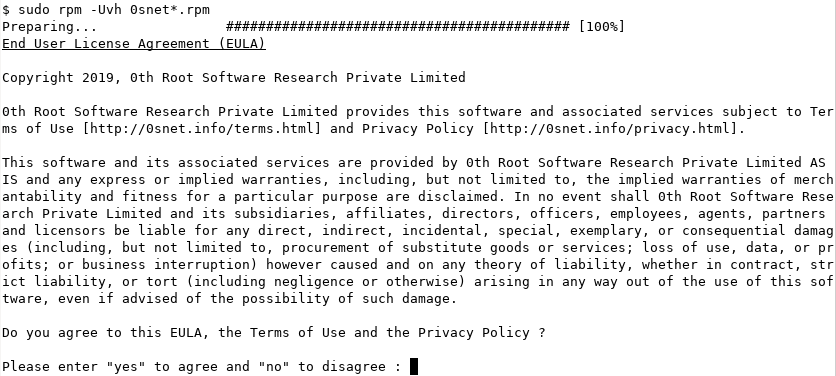
3. Installing 0SNet
To install the packages, 0snet and 0snet-uman, we need to directly use the rpm command instead of yum. This is because of the EULA that gets shown at the time of installation. Please run the following command to install 0SNet,
sudo rpm -Uvh https://www.0throot.com/download/x86_64/{0snet,0snet-uman}.el7.rpm
|
Public AMI
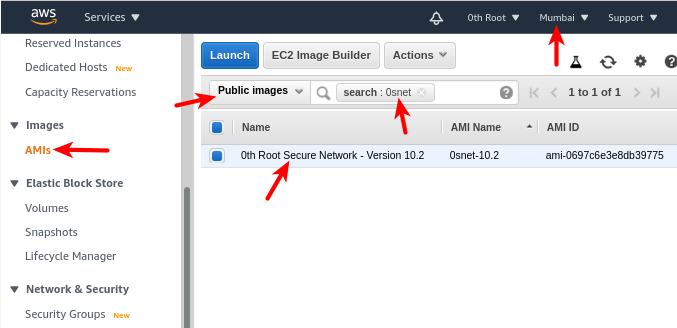
0SNet is available as a public amazon machine image (AMI) in N. Virginia, Mumbai and Singapore regions. If you require the AMI in any other region, we can make it available.1
In AWS console (see image below), choose the correct region,
- Open services and select EC2
- On the sidebar, select AMI under Images
- Select Public Images in the drop down to the left of search bar
- Search for keyword, 0snet
- Choose 0th Root Secure Network and click Launch 2
- Remember to open ports 80 and 443 when configuring Security Group
Once the instance is successfully created, add a wildcard DNS record for the chosen domain, such as *.corp.example.com, to its Elastic IP.
[1] You can also bear the minor costs and copy the AMI.
[2] To login to the new instance, SSH as ec2-user@Elastic-IP.
|
Custom Image
0SNet is available as a publicly shared custom image.
gcloud CLI can be used to create a new instance from this custom image. The uri of the image family is listed below,
https://www.googleapis.com/compute/v1/projects/id-0snet/global/images/family/stable-0snet
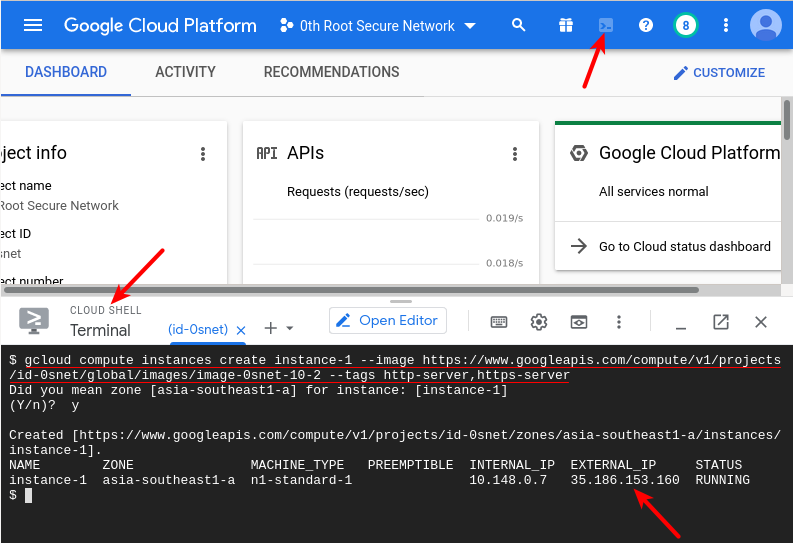
The following command1 creates a new instance from the custom image, with HTTP (80) and HTTPS (443) ports open,
gcloud compute instances create INSTANCENAME --image-family https://www.googleapis.com/compute/v1/projects/id-0snet/global/images/family/stable-0snet --tags http-server,https-server
On successful run of the above command, a new instance is created. Now, add a wildcard DNS record for the chosen domain, such as *.corp.example.com, to the displayed External IP.2
[1]
choose zone and machine type with options
--zone and --machine-type
[2]
remember to
make the external IP static
|
|
There are two approaches available to setup 0SNet in Azure, ie., by creating a virtual machine directly or through Azure Compute Gallery. At the moment, it is easier to directly create the virtual machine and do the installation.
Virtual Machine [RECOMMENDED]
Go to create Virtual Machine page and follow the steps below
- Under BASICS Tab,
- Choose New Resource Group eg:- snet
- Choose Region
- Choose Image "CentOS-based 7.9 Gen 1" (Search: centos)
- Choose Instance Size (Minimum 1GB RAM, Recommended 4GB RAM)
- Inbound Port Rules, Choose SSH, HTTP and HTTPS
- Under NETWORKING Tab,
- Choose Virtual Network (should be same as Application) [IMPORTANT]
- Go to REVIEW + CREATE and create the virtual machine
Once the virtual machine is created, add a wildcard DNS record for the chosen domain, such as *.corp.example.com, to the server's Public IP. After which, login over SSH and follow the manual steps.
Azure Compute Gallery
0SNet is available as an image in azure compute gallery. To access the image across tenants, authorization is required. The steps below require access to azure CLI,
1. Create a new Resource Group
az group create --location <location> --name myVM_group
2. Identify your tenant ID
az account show --query "tenantId"
3. Open the following authorization URL, after substituting <tenantId>
https://login.microsoftonline.com/<tenantId>/oauth2/authorize?client_id=0f844e19-3145-4179-9c89-7b1b60901481&response_type=code&redirect_uri=https%3A%2F%2Fwww.microsoft.com%2F
4. Authorize access to the resource group (myVM_group), as shown in the images below,
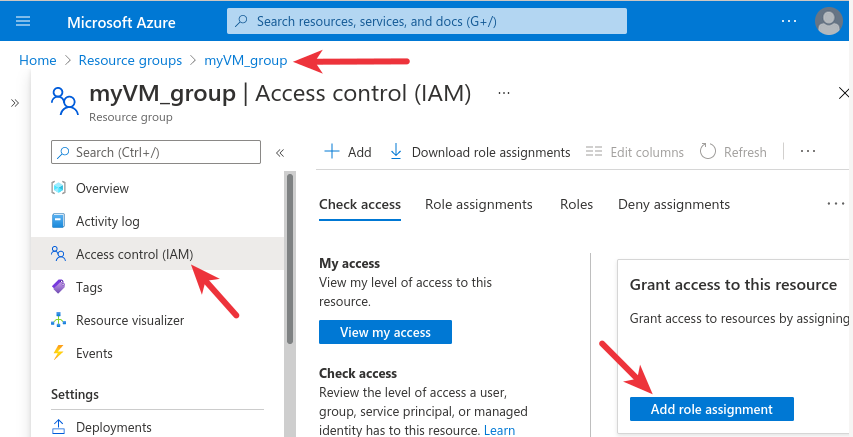
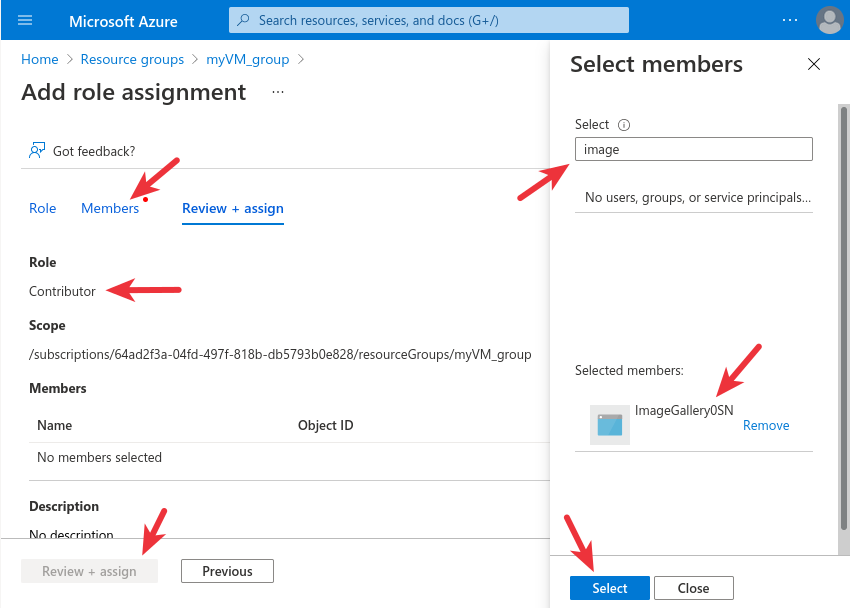
5. To install from the image, run the commands listed below. Reach out to us at support@0throot.com to get <Your-Password> (expires in a few days)
az account clear
az login --service-principal -u "0f844e19-3145-4179-9c89-7b1b60901481" -p "<Your-Password>" --tenant 08480fa8-ba9f-4101-9723-366c81d85da4
az account get-access-token
az login --service-principal -u "0f844e19-3145-4179-9c89-7b1b60901481" -p "<Your-Password>" --tenant <tenantId>
az account get-access-token
az vm create --resource-group myVM_group --name myVM --image "/subscriptions/64ad2f3a-04fd-497f-818b-db5793b0e828/resourceGroups/images/providers/Microsoft.Compute/galleries/0snet/images/stable/versions/latest" --admin-username azureuser --size Standard_B1s --ssh-key-name mykey --vnet-name myVM_vnet
6. Remove Authorization (IMPORTANT)
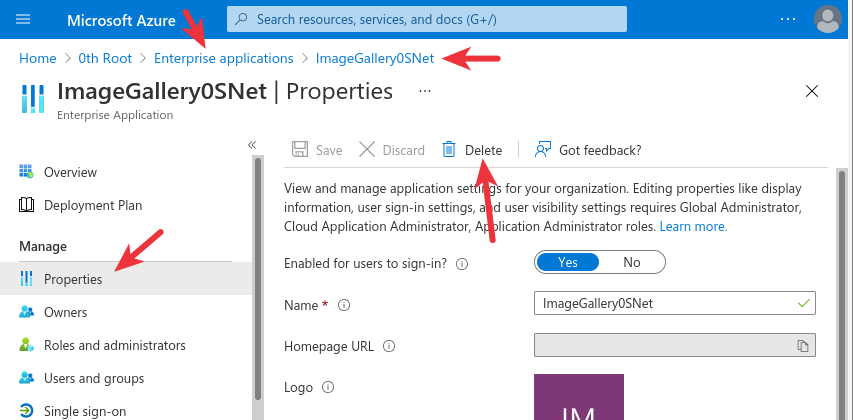
Once az vm create command executes succesfully, add a wildcard DNS record for the chosen domain, such as *.corp.example.com to the VM's public IP.
(The above method is NOT RECOMMENDED as it uses Contributer role)
|
0SNet is provided as per these terms of use and privacy policy .
If you face any problems, please feel free to contact us.
Configuration
If you have chosen a domain such as .corp.example.com. You should configure your nameserver (DNS) to resolve the wildcard entry *.corp.example.com to the IP address of 0SNet server.
When Google Sign-In or Microsoft Sign-In is enabled, 0SNet will require login through the corresponding user account. Hence, don't use group email address or a mailing list during configuration.
If 0SNet is hosted on a server without public IP, change the Let's Encrypt mode to DNS with the command: sudo 0snet --letsencrypt mode dns
Setup (1/3)
Type the following command,
sudo 0snet --configure
This should bring up the following screen,
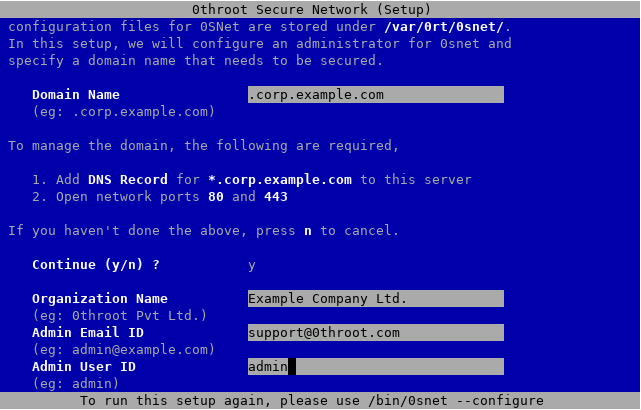
Fill out the form with your domain name, organization name, email ID and user ID. TLS certificate for the administrator will be sent to the specified email address. Choose your user ID carefully, because it will not be possible to modify this later.
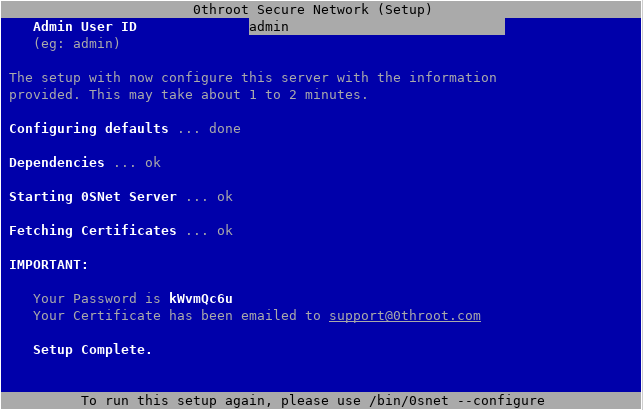
IMPORTANT: Note down the password. In case you don't remember it, you can reconfigure 0SNet using,
sudo 0snet --configure
After the Setup Complete message, you should receive an email at the specified address, check your spam/bulk folder if necessary. The email should contain one attachment, sign.p12. It is your personal certificate encrypted using the password and it should be imported into your browser under personal certificates. If you are unsure, as to how to import the certificate, kindly follow the steps here.
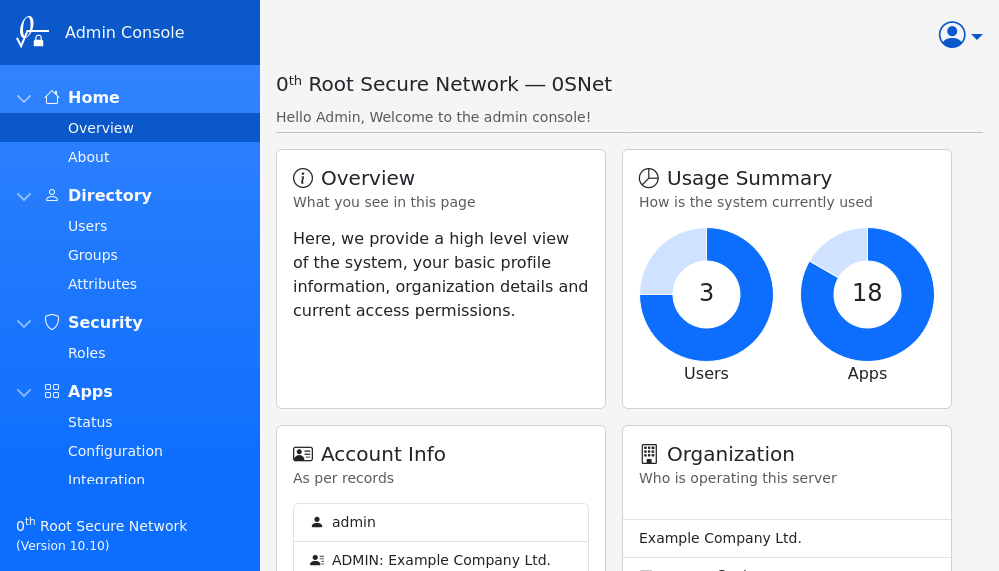
Admin Console (2/3)
Once the certificate is imported, you will be able to access the admin console. A special subdomain 0snet is reserved for this purpose. For example, If you have configured your domain as .corp.example.com, you should open https://0snet.corp.example.com.
On successful connection, Browser will ask for a client certificate to be selected. On choosing the correct one, a login page for 0SNet will be shown. Enter the generated password, and set a new one for successful login.
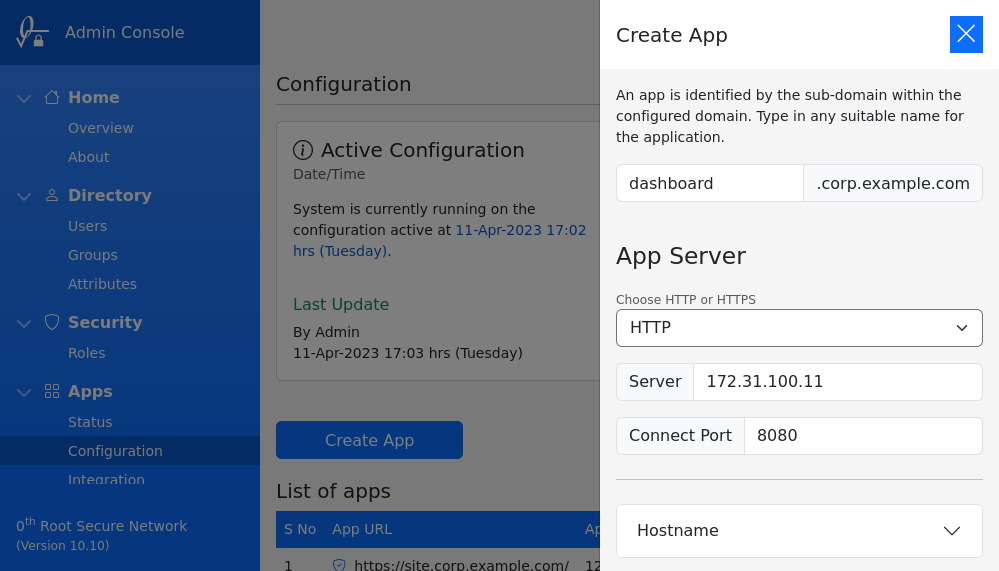
Apps (3/3)
App Manager should be used to add subdomains, along with IP address / Hostname of origin server, as shown in the image below,
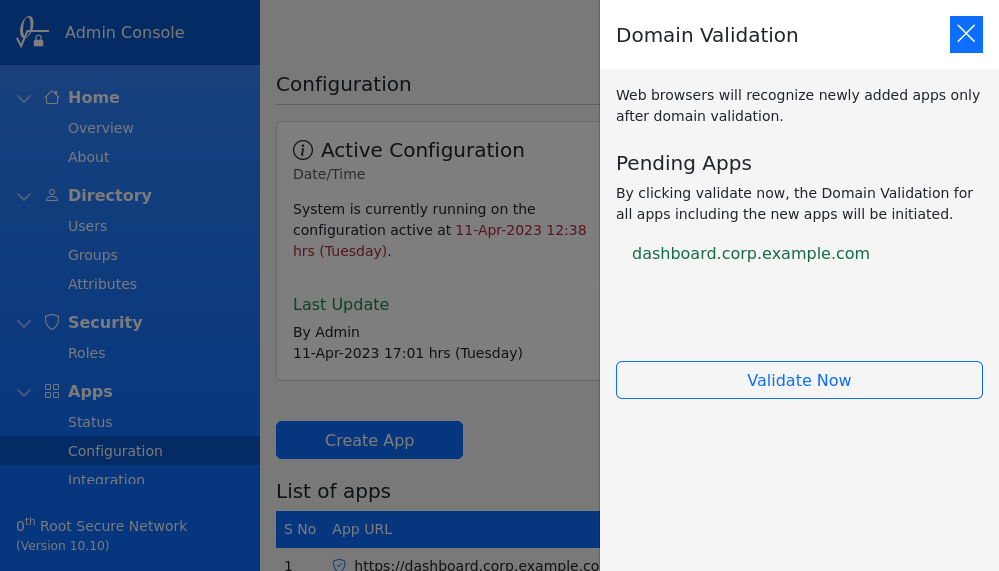
After adding the subdomain, go to Pending Apps and click on Validate Now to validate the domain. The new subdomain will be ready to use within 5 mins.
Certificates
0SNet sends an email to users containing their personal certificate file. In this section, the steps to import the certificate has been provided in detail,
| Windows |
Mac |
Linux / Firefox / Other |
|
|
|
|
|
|
Android / iOS / Windows / Mac
On most devices, simply opening the sign.p12 file (double-click or tap to open) is sufficient to import the certificate.
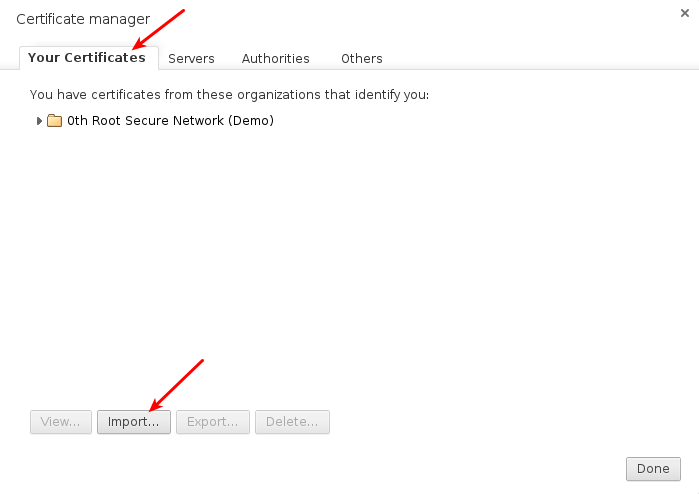
Preferences
On Linux / Firefox / Opera browser, Search for "certificates" in the browser settings or preferences, and you will likely find "Manage Certificates" or "View Certificates". On opening it, click the Import button under "Your Certificates" or "Personal Certificates" tab and choose the certificate file, sign.p12.
On Google Chrome, you can use the direct link chrome://settings/certificates.
When prompted for a password, type the generated password that has been provided by the administrator.
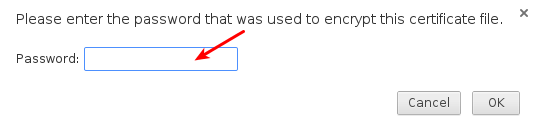
The certificate should be imported successfully.
To protect the imported certificates, it is recommended that you set a Master Password for the browser.
Roles
By default, all users have equal access to the applications, for example: *.corp.example.com. To differentiate users and grant access only to specific application(s), for example: webapp.corp.example.com, roles should be used.
There are two distinct type of roles, ie., System and User roles.
System Role
The default permissions to applications is maintained by the System role. It uses a combination of mode and permissions, as shown in the image below,
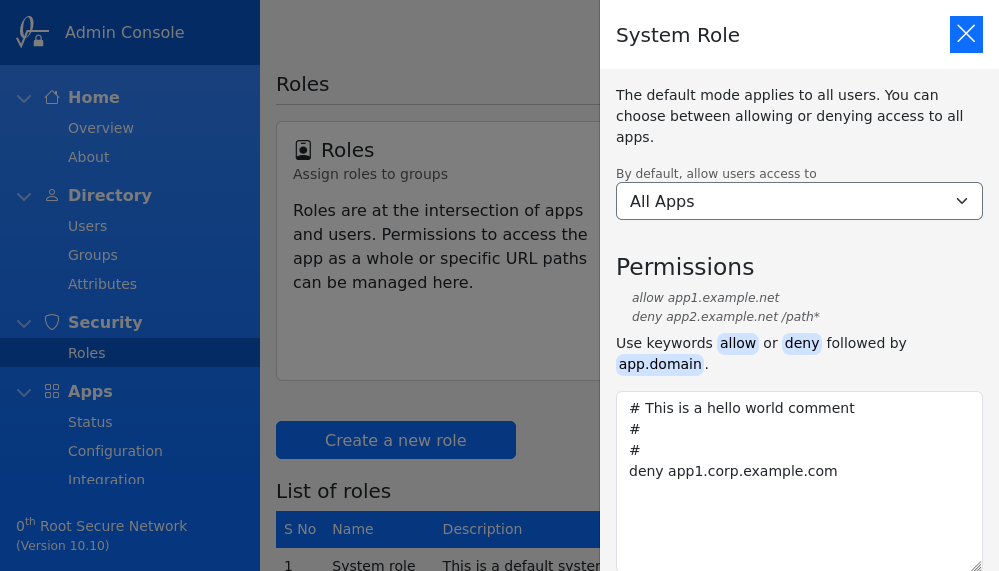
On save, the permissions are immediately applied.
Mode
By default you can grant users access to All Apps (or) Nothing. When All Apps is selected, as the name suggests, all applications will be accessible. However, in case Nothing is selected, opening an application will show unauthorized error page.
Permissions
To alter the default behavior of selected mode, permissions can be used. The syntax of a permission is as follows,
<deny or allow> <subdomain> [</url> or </urlprefix>]
All permissions in the example below are valid, they collectively define access for users,
 allow myapp.corp.example.com
 deny myapp.corp.example.com /this/path/*
 deny webapp.corp.example.com /this/file.php
URL path prefix or an absolute path to file can be optionally specified, as shown in the example above. However, query string and anchor element cannot be matched.
User Role
New roles can be created by clicking on Create a new role. Only after creation, the permissions can be added and groups can be assigned.
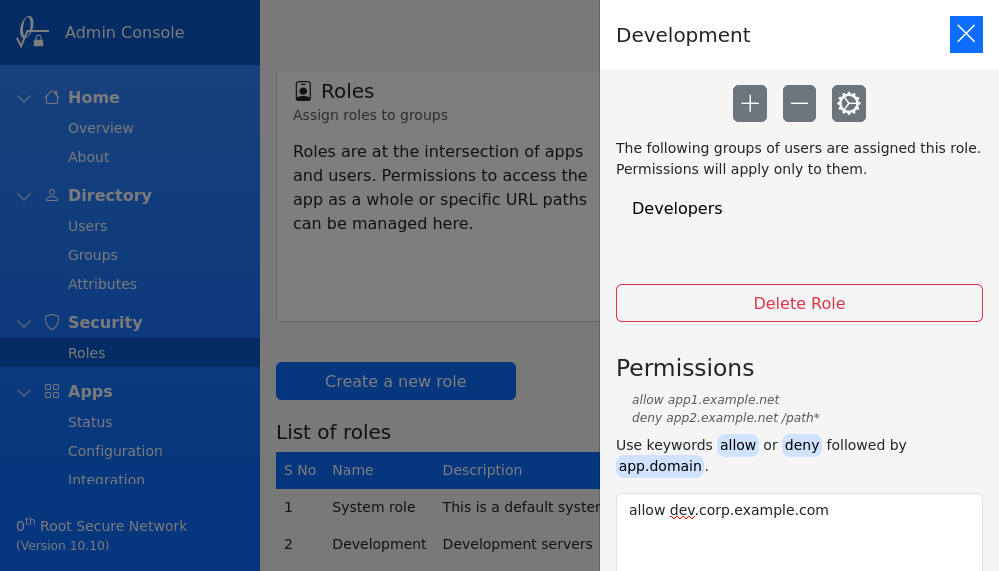
Groups
Roles are assigned to groups. It is straight forward to create a group and add/remove users.
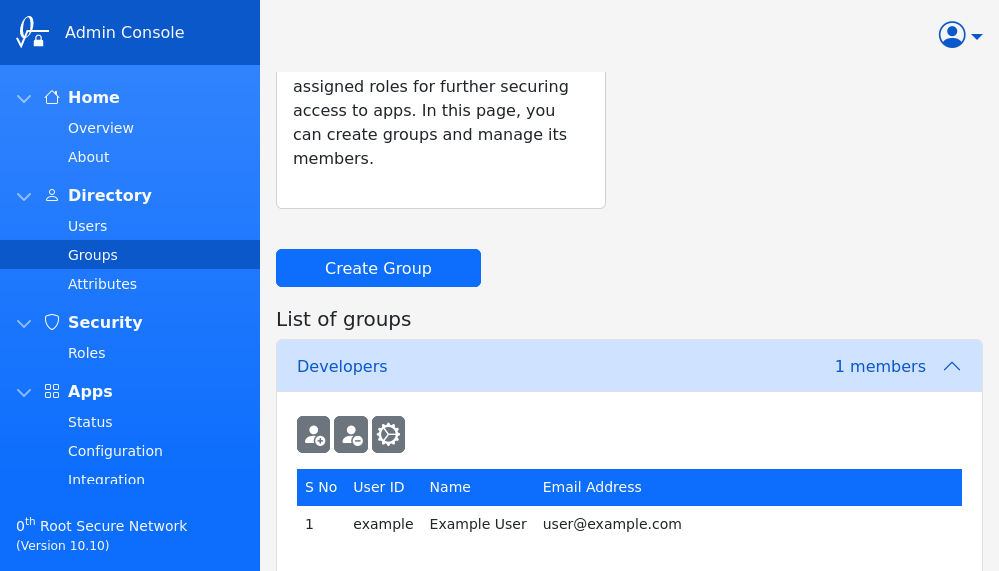
Users can belong to multiple groups and hence can have various roles. Permissions from all the assigned roles, as well as the System role, will be used in authorization. In case of conflicts, longer URL paths and deny permissions take higher precedence.
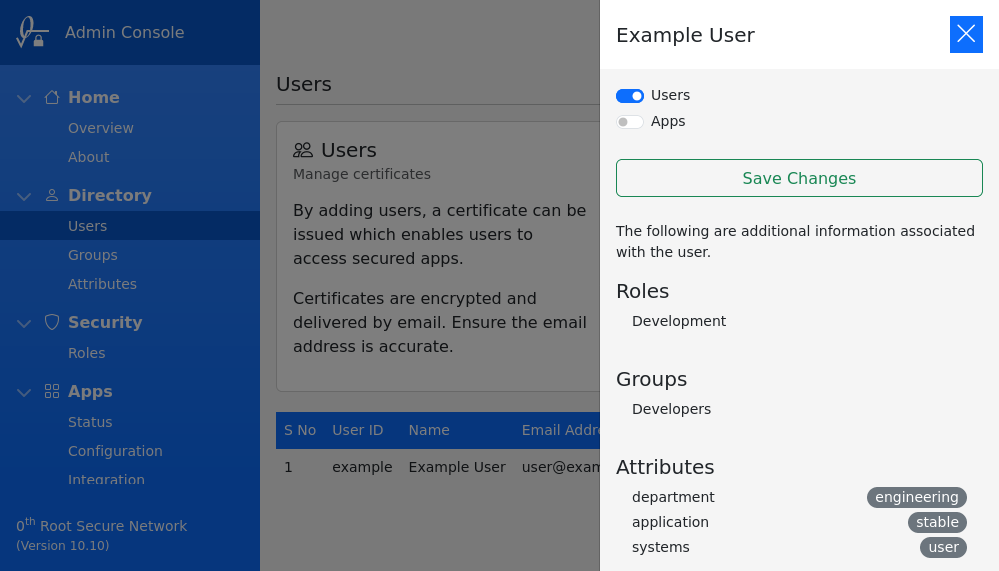
List of applicable roles and groups can be viewed in Users section, under details of selected user.
Version
Details of last change in roles can be checked with,
sudo 0snet --ac
0SNet maintains a version for every update to mode and permissions. The above command will output details of current version.
Attributes
This feature provides a way for applications to identify the logged in user and their attributes. User attributes can be anything custom, defined by the organization, associated to users. To give a few examples, attributes can be:
- application roles (user, manager, administrator), or
- access to features (minimal, new, audit), or
- associated to a/b testing (alpha, beta, stable)
Configuration
In the example screenshot below, there are three different attributes with 3 values each.
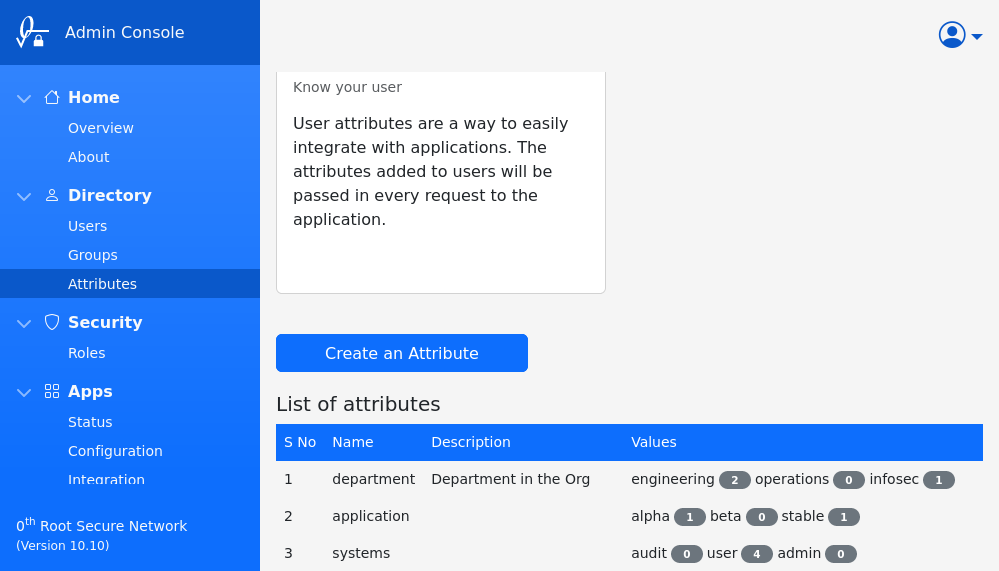
An attribute can have many values and a given user can be associated to only one of those values. Each of the values can be either enabled or disabled. The default state of newly added value is enabled.
Integration
The information about the user and their associated attributes are shared with the application via a HTTP header, X-0SNet-User. The attributes are namespaced by adding the prefix snet: to their names, for example: an attribute app will appear as snet:app in the JWT payload. A sample JWT payload is as follow:
{
    "iss": "0th Root Secure Network",
    "aud": "0th Root",
    "sub": "admin",
    "iat": 1647507494,
    "nbf": 1647507494,
    "exp": 1647509294,
    "email_verified": true,
    "email": "user@example.com",
    "name": "ADMIN: Example User",
    "snet:department": "operations",
    "snet:application": "stable",
    "snet:systems": "admin"
}
The JWT payload will include default attributes such as sub, name and email to identify the user along with the custom attributes.
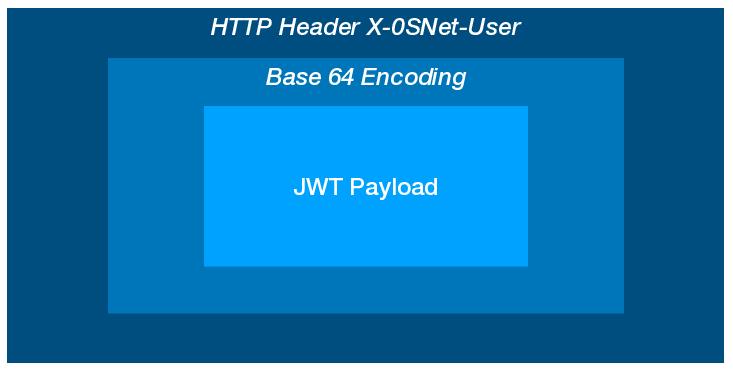
The value of X-0SNet-User header is simply a base64 encoded JWT Payload (only) which can simply be decoded and parsed as a JSON text to access the attributes. A sample code can be found under Integration section.
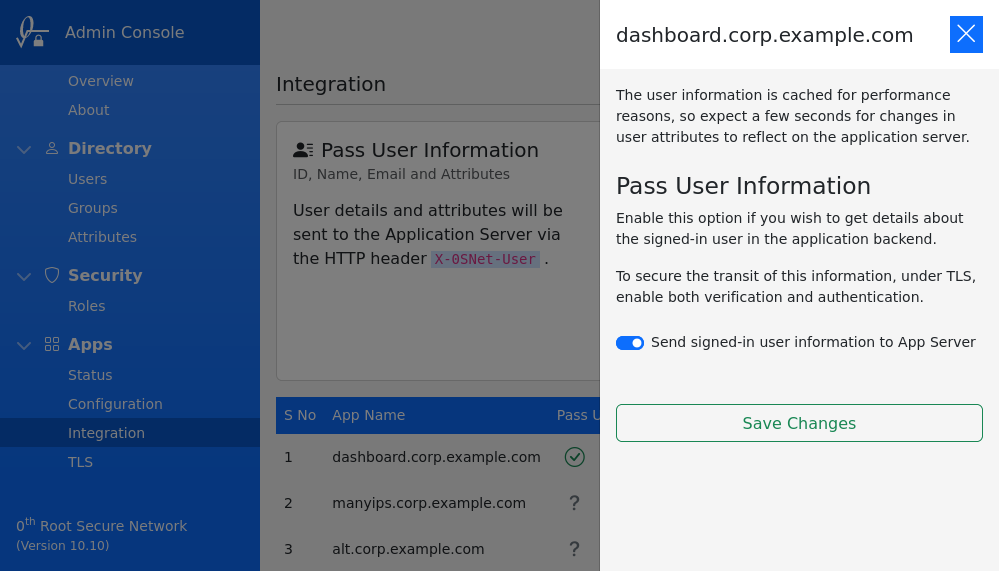
For the header to be added to the requests, the option Pass User Information should be enabled for the application, under Integration section. Once enabled, all requests to the application will include the X-0SNet-User header.
Any change in user attributes can take up to 30 seconds to reflect in the header due to an in-built cache.
Google Sign-In
Instead of 0SNet password authentication, Google OAuth can be used through the Google Sign-In (GSI) feature. When GSI is used, the user is prompted with a Sign In button, as shown below, instead of the usual username and password,
The email address of the user should match the Google account used for login.

Configuration
Create a new client ID for 0SNet, in Google API Console, and specify the javascript origins. When 0SNet is configured for *.example.com, the javascript origins would be a.example.com, b.example.com and so on. Unlike 0SNet, wildcard is not supported, hence all internal applications and websites need to be added individually.

Enable GSI
The client ID can be set in 0SNet and GSI can be enabled using the command shown below,
sudo 0snet --gsi on [client-id]
Additional client IDs specific to domains can be added as follows,
sudo 0snet --gsi clientid [domain] [client-id]
To disable GSI at any point, the following command should be used,
sudo 0snet --gsi off
Do remember to restart 0SNet for changes to take effect,
sudo 0snet --stop && sudo 0snet --start
Process Changes
The user creation and certificate installation processes remain the same. Only at the time of login, the user is prompted with a Sign-In button instead of user name and password. Hence, with GSI, user doesn't need access to 0SNet password or username, expect at the time of certificate installation.
Related Notes
When GSI is enabled, 0SNet Server requires access to public internet to function. It verifies the connection to external servers using the trusted root certificates available on the server, typically at /etc/pki/tls/certs/ca-bundle.crt. All CAs are treated equally, so it is important to keep the CA bundle upto date.
Microsoft Sign-In
Instead of password authentication method, 0SNet can be configured to use Microsoft OAuth 2.0 through the Microsoft Sign-In (MSI) feature. When MSI is enabled, users will be prompted with a Sign In button to login, as shown below,
The email address of the user should match the Microsoft account used for login.
Configuration
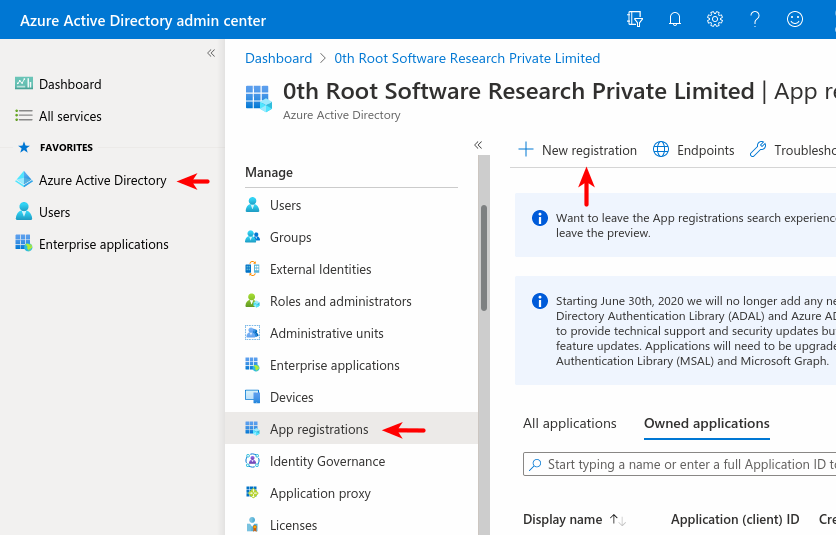
A client-id provided by Microsoft is needed to enable MSI in 0SNet. It can be found in Azure Active Directory.

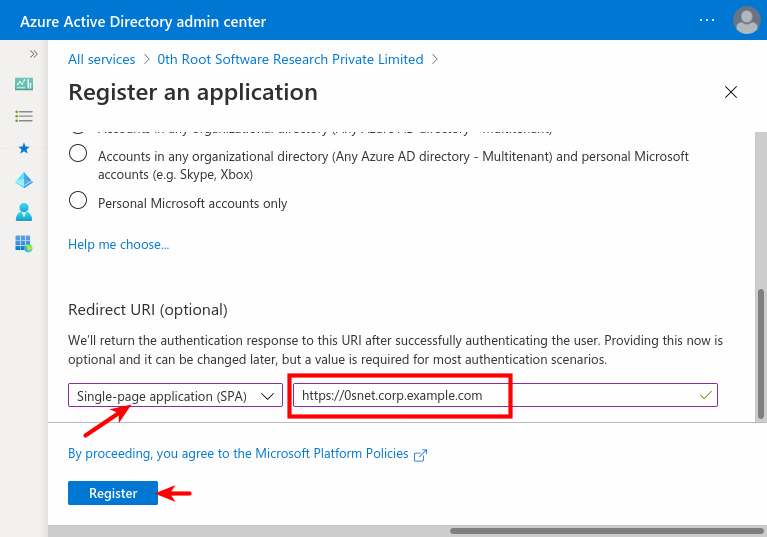
An application need to be registered, as shown in the images below,
 Choose “Accounts in any organizational directory” ie., Multitenant, or whichever is relevant,
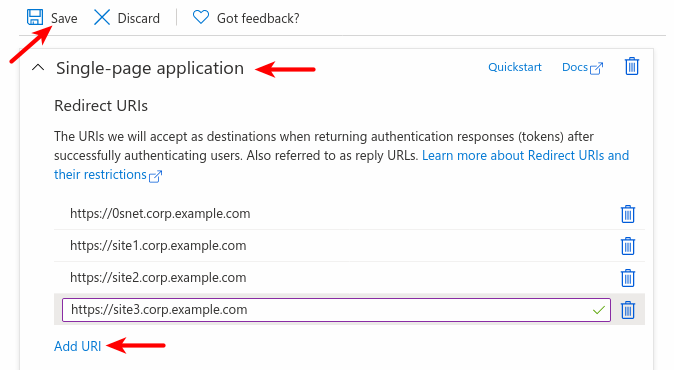
And, to support Sign-In across all sites configured under 0SNet, they need to be added under Redirect URIs for the application,
Enable MSI
The client-id can be set in 0SNet to enable MSI using the command shown below,
sudo 0snet --msi on [client-id]
To disable MSI at any point, the following command should be used,
sudo 0snet --msi off
Do remember to restart 0SNet for changes to take effect,
sudo 0snet --stop && sudo 0snet --start
Single Tenant
Optionally, if you choose Supported account types as Single tenant, tenant-id can be added with the command shown below,
sudo 0snet --msi tenant [tenant-id]
Do remember to restart 0SNet for changes to take effect,
sudo 0snet --stop && sudo 0snet --start
Process Changes
The user creation and certificate installation processes remain exactly the same. Only at the time of login, users will be presented with a Microsoft Sign-In button. Hence, with MSI enabled, password for the user will need to be used only for certificate installation.
Related Notes
Enabling MSI adds a dependency on Microsoft Login and Microsoft Graph API services. If any of them are down, users will not be able to login to 0SNet. This also essentially means, a public internet connection is required on the 0SNet server.
The connections to Microsoft services are verified using the trusted root certificates available on the server, typically at /etc/pki/tls/certs/ca-bundle.crt. All CAs are treated equally, so it is important to keep the CA bundle upto date.
OpenID Connect Sign-In
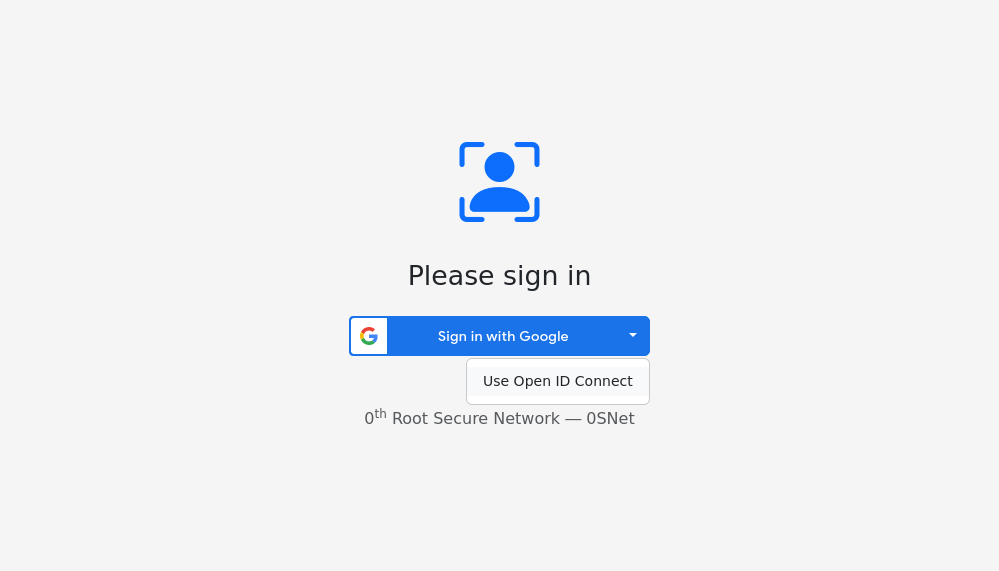
Instead of password authentication method, 0SNet can be configured to use any Identify Provider supporting OpenID Connect (OIDC). When OIDC is enabled, users will be prompted with an OpenID button to login, as shown below,
The email address of the user should match the account used for login.

Fallback for Google or Microsoft Sign-In
OpenID Connect can also be used as a backup login for Google or Microsoft Sign-In. This requires setting the UX option to fallback, as follows,
sudo 0snet --oidc config ux fallback
As shown in the image below, a dropdown with option Use Open ID Connect will be displayed in fallback mode. The experience will be similar for both Google Sign-In and Microsoft Sign-In, when enabled along with OpenID connect.
All configuration options are mentioned in quick reference
Configuration
An OpenID configuration URL and a Client ID provided by Identity Provider is needed to enable OIDC in 0SNet.
Redirect URIs
When creating the client-id, it is necessary to add the callback URL under Authorized Redirect-URIs. This enables the identity provider to transmit authentication information.
https://0snet.corp.example.com/.snet-known/oidc-callback
Replace the domain in the above Redirect URI with your configured domain.
Enable OIDC
The client-id and config-url can be set in 0SNet to enable OIDC using the command shown below,
sudo 0snet --oidc on [client-id] [config-url]
To disable OIDC at any point, the following command should be used,
sudo 0snet --oidc off
Do remember to restart 0SNet for changes to take effect,
sudo 0snet --stop && sudo 0snet --start
Authentication flows
By default, the Implicit flow is used for authentication. Optionally, you can change to the Code flow by using the command shown below,
sudo 0snet --oidc config flow code+pkce
If token endpoint requires authentication, the authentication method along with client-secret can be set in 0SNet using the command show below,
sudo 0snet --oidc config auth post:client-secret
Do remember to restart 0SNet for changes to take effect,
sudo 0snet --stop && sudo 0snet --start
Process Changes
The user creation and certificate installation processes remain exactly the same. Only at the time of login, users will be presented with an OpenID button. Hence, with OIDC enabled, password for the user will need to be used only for certificate installation.
Related Notes
Enabling OIDC adds a dependency on the Identity Provider. If they are down, users will not be able to login to 0SNet.
The connections to Identity Provider are verified using the trusted root certificates available on the server, typically at /etc/pki/tls/certs/ca-bundle.crt. All CAs are treated equally, so it is important to keep the CA bundle upto date.
Reports
This page provides an overview of reporting capabilities. 0SNet maintains a detailed log of all activities performed by administrators, as well as users. These logs serve as the basis for generating reports.
There are three types of reports that can be generated —
| # | Type | Contents |
|---|
| 1 | events-user | Actions performed by regular users, such as signing in |
| 2 | events-admin | Actions performed by administrators, such as creating user accounts |
| 3 | users-active | All currently active users, along with information such as their last login, creation date |
The reporting functionality outputs the reports in CSV format, making it easy to view it in your tool of choice.
Options
To generate a report, please run the following command,
sudo 0snet --report <type> [YYYY-MM-DD [YYYY-MM-DD]]
Where, type is one of the report types listed in the table above. Optionally, the start date and end date can be specified to generate report for a given date range. A few examples are as follows,
sudo 0snet --report events-user 2023-01-01 > user-actions-since-jan-1.csv
sudo 0snet --report events-admin > all-admin-actions.csv
sudo 0snet --report users-active 2022-04-01 2023-03-31 > active-users-in-fy.csv
Fields
The reports that you generate will include the following fields —
| events-user | events-admin | users-active |
|---|
| Date/Time | Date/Time | User ID |
| Event | Event | Creation Time |
| Result | Result | Deletion Time |
| User ID | Admin ID | Last Login |
| Remote IP Address | User ID | Status |
| Details | Details | |
License
0SNet incorporates a licensing system for easier distribution and sale of software. Every install of 0SNet comes with a license file which works for upto 3 users. You can review the license information using the following command,
$ sudo 0snet --license info

0throot license file

     License Key : UzXE/CV82m6kysyrtYQfv6X13wX6tWdnR/IPeULoaroR
         Product : 0th Root Secure Network
          Domain : .corp.example.com
    Organization : Example Company Ltd.
  Date of Expiry : Dec 24, 2019 14:17 IST
           Users : 5
      Valid Upto : N/A

Contact us @ support@0throot.com for any queries.
License files are updated periodically (default: 1hr) through a cronjob. To update them manually, please run,
sudo 0snet --license sync
Command Line Interface (CLI)
0snet --cli <action> <arguments>
actions:-
useradd, userreset, userdelete, userstatus, usergroup
arguments:-
    --name "full name"
    --email "email address"
    --userid "user-id"
    --group "group name"
    --nocert
    --enable
    --disable
    --add
    --remove
    --json
usage:-
    useradd --name <> --email <> --userid <> [--group <>]
    userreset  (--userid <> | --email <>)
    userdelete (--userid <> | --email <>)
    userstatus (--userid <> | --email <>) (--enable | --disable)
    usergroup  (--userid <> | --email <>) --group <> (--add | --remove)
DESCRIPTION
The --cli option of 0snet utility provides
a command line interface to manage users within 0th Root
Secure Network (0SNet). The utility can output in JSON
format for easier integrations, refer to OUTPUT section for
more details. And, to know more on possible integrations,
refer to INTEGRATION section.
useradd can be used to add new user, it requires
the --name, --email, --userid to be
specified. user-id should be a single word with one or more
of the following characters, a-z A-Z 0-9 - . _ :.
Optionally, the newly created user can be added to groups
by specifying the group name, with --group argument.
Multiple groups can be specified by repeating --group.
And, --nocert can be used to add the user without
certificate.
By default, newly added users are enabled, and
they are not administrators. User manager should be
used to set the added user as an administrator, if
needed.
userreset will reset user certificate and
credentials. The command outputs the new password, and it
should be securely communicated to the user. When
--email is used, all users matching the email address
are reset.
userdelete can be used to delete user(s). All
users matching the email address are deleted when using
--email.
userstatus should be used when a user needs to be
disabled, or when a disabled user needs to be re-enabled. On
using the --email argument, all matching users are
updated.
usergroup will add or remove user(s) from the
specified list of groups. Multiple groups can be specified
by repeating the --group argument. In case of a
failure, the user(s) may be added or removed from some
groups and not all.
The actions userstatus and usergroup are
idempotent, and can be safely repeated, in case of
any error.
OUTPUT
In case of errors, the exit code of the command will be
non-zero. The output format for useradd will be,
<user-id> <password>
And, when --json argument is specified, the
output format changes to a JSON text, as follows,
{"status":{"code":0,"message":""},"output":{"<user-id>":"<password>"}}
In case of an error, the above JSON text will have
code set to non-zero value and message
will contain the description of the error.
For userreset, the output may contain multiple
user-ids and passwords, one per line, when --email
argument is used. The output JSON text can also have
multiple user-ids as keys with corresponding passwords as
values.
INTEGRATION
Scripts can be developed to process user information and
pass on to 0snet-cli to perform a specific action. This
could be a one-time task, such as for bulk addition of
users, or could be a cron job for periodically adding and
removing users.
A job management system could also be used, to securely
login to server and run 0snet-cli to perform a specific
action.
Exposing the actions of 0snet-cli as a service is NOT
RECOMMENDED.
EXAMPLES
In the examples below, the first line is the command
and the below lines are output of the command,
$ sudo 0snet --cli useradd --name "Example User" --email "user@example.com" --userid "example1"
example1 kfuKN16t
$ sudo 0snet --cli userstatus --userid "example1" --disable
updated user(s) successfully
$ sudo 0snet --cli userreset --userid "example1" --json
{"status":{"code":0,"message":""},"output":{"example1":"Ipt38AY8"}}
$ sudo 0snet --cli usergroup --userid "example1" --group "Employee" --add
updated users and groups successfully
$ sudo 0snet --cli userstatus --userid "example1" --enable --json
{"status":{"code":0,"message":"updated user(s) successfully"}}
$ sudo 0snet --cli userstatus --userid "example1"
example1 enabled
$ sudo 0snet --cli useradd --name "Example User (Mobile)" --email "user@example.com" --userid "example2" --group "Sales" --group "Employee" --json
{"status":{"code":0,"message":""},"output":{"example2":"lbLgduIA"}}
$ sudo 0snet --cli userreset --email "user@example.com"
example2 RqaHy9zH
example1 Scrn3HJ3
$ sudo 0snet --cli userdelete --userid "example2"
deleted user(s) successfully
$ sudo 0snet --cli usergroup --userid "example1" --group "Employee" --remove
updated users and groups successfully
Quick Reference
BASIC COMMANDS
sudo 0snet --status | Check if server is running |
sudo 0snet --start | Start the server |
sudo 0snet --stop | Stop the server |
sudo 0snet --graceful-stop | Gracefully stop the server |
sudo 0snet --reload | Gracefully reload the server |
sudo 0snet --stop && sudo 0snet --start | Restart the server |
LICENSE MANAGEMENT
sudo 0snet --license info | Show details of current license file |
sudo 0snet --license sync | Download new license file |
sudo 0snet --license sync status | Display status of license file sync |
sudo 0snet --license sync off | Disable automatic sync |
sudo 0snet --license sync on | Enable automatic sync |
GOOGLE SIGN-IN (GSI)
sudo 0snet --gsi on [client-id] | Enable Google Sign-In |
sudo 0snet --gsi off | Disable Google Sign-In |
sudo 0snet --gsi method status | Current login method |
sudo 0snet --gsi method sign-in |
Choose Sign-In method (deprecated) |
sudo 0snet --gsi method identity-services |
Enable Identity Services (default) |
sudo 0snet --gsi clientid | List configured client IDs |
sudo 0snet --gsi clientid <domain> <client-id> |
Set client ID for domain |
sudo 0snet --gsi clientid <domain> unset |
Unset client ID for domain |
sudo 0snet --gsi openid status | Check OpenID document status |
sudo 0snet --gsi openid sync | Download OpenID document and keys |
sudo 0snet --gsi openid verify:<mode> |
Change verification mode
Available modes: iv, i, v |
MICROSOFT SIGN-IN (MSI)
sudo 0snet --msi on [client-id] | Enable Microsoft Sign-In |
sudo 0snet --msi off | Disable Microsoft Sign-In |
sudo 0snet --msi tenant [tenant-id] | Specify Tenant ID or "common" |
sudo 0snet --msi openid status | Check OpenID document status |
sudo 0snet --msi openid sync | Download OpenID document and keys |
sudo 0snet --msi openid verify:<mode> |
Change verification mode
Available modes: aiu, ai, iu, i, a |
OPENID CONNECT SIGN-IN (OIDC)
sudo 0snet --oidc on [client-id] [config-url] | Enable OpenID Connect |
sudo 0snet --oidc off | Disable OpenID Connect |
sudo 0snet --oidc sync | Download OpenID document and keys |
sudo 0snet --oidc status | Show OpenID configuration and document status |
sudo 0snet --oidc config ux <value> |
Change user experience
Available values: fallback, primary |
sudo 0snet --oidc config mode <mode> |
Change verification mode
Available modes: i, iu |
sudo 0snet --oidc config flow <flow> |
Change authentication flow
Available flows: implicit, code, code+pkce |
sudo 0snet --oidc config auth <auth>[:secret] |
Change authentication method
Available methods: none, basic, post |
SYNCHRONIZATION BETWEEN SERVERS (RSYNC)
Secondary server actions
sudo 0snet --rsync check
sudo 0snet --rsync check on
sudo 0snet --rsync check off
| Check for changes from primary server |
sudo 0snet --rsync clean
|
Clear local state
|
Primary server actions
sudo 0snet --rsync key |
Show SSH public key to add to Secondary servers |
sudo 0snet --rsync users             <host> [ssh-options]
sudo 0snet --rsync users,login       <host> [ssh-options]
sudo 0snet --rsync users,login,certs <host> [ssh-options]
| Sync data once |
sudo 0snet --rsync users <host> :B:<bastion> [ssh-options]
| Sync data once via <bastion> server |
sudo 0snet --rsync config <host> [ssh-options] | Sync configuration once |
LET'S ENCRYPT MANAGEMENT
sudo 0snet --letsencrypt mode | Get current mode |
sudo 0snet --letsencrypt mode <mode>
| Set Let's Encrypt mode
Values: auto, dns, off |
sudo 0snet --letsencrypt 0snet <0snet-?> |
Change reserved subdomain
Examples: 0snet-a, 0snet-1 |
sudo 0snet --letsencrypt 0snet on |
Reset reserved subdomain to 0snet |
sudo 0snet --letsencrypt hosts |
Check current reserved subdomain in the hosts list |
MISCELLANEOUS
sudo 0snet --act tlsconfig <key> <cert> |
Use custom TLS server certificate instead of Let's Encrypt issued certificates |
sudo 0snet --opt authcert
sudo 0snet --opt authcert enforced
sudo 0snet --opt authcert configurable
| Enforce TLS Client Certificate Authentication (or) Allow it to be configurable |
High Availability
0SNet is a highly flexible and resilient system, it can be deployed on multiple servers across regions to form a cluster of servers. Due to the decentralized architecture, servers can run independently and are resilient to failure on other servers.
Architecture
It uses a Primary-Secondary architecture where the administration happens on the Primary server while the serving happens through one or more Secondary servers. A push mechanism is used to transfer the data periodically to the Secondary servers.
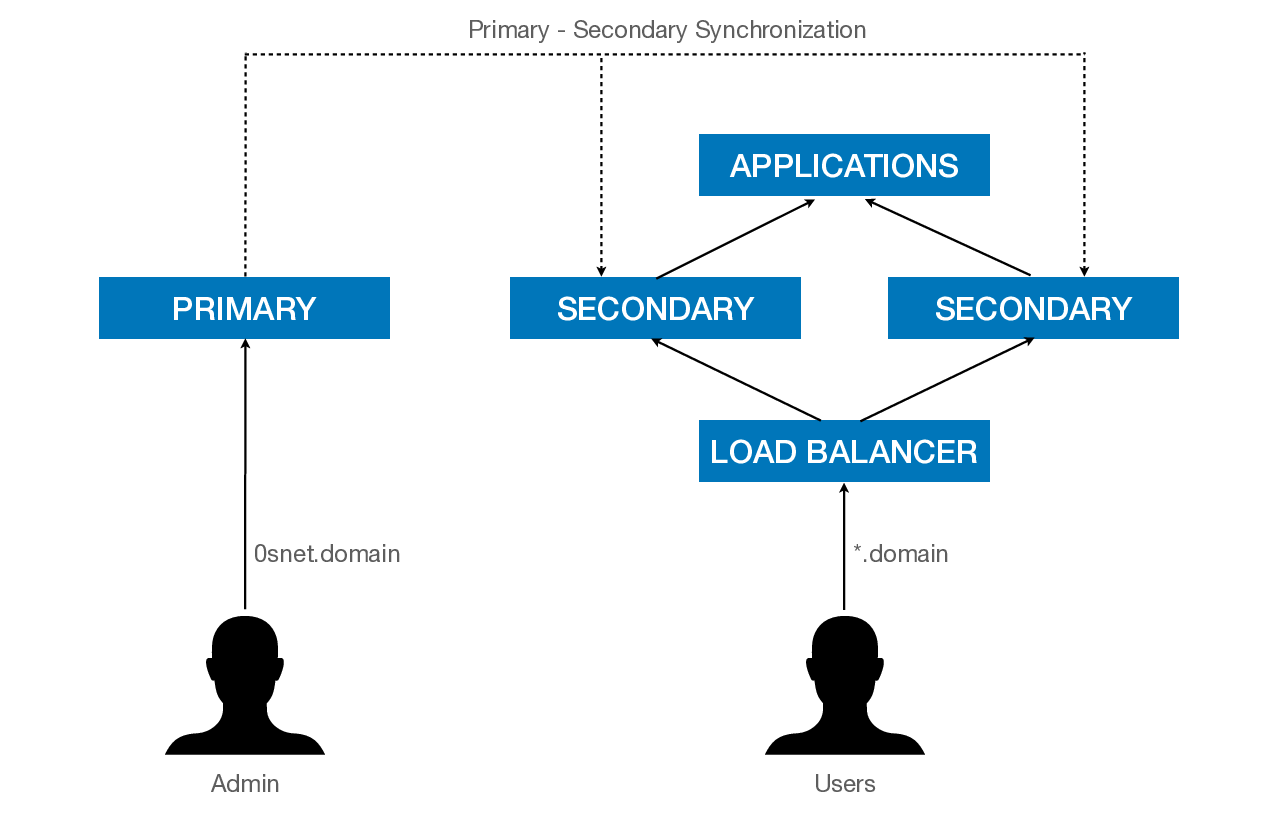
To perform zero downtime maintenance, two or more Secondary servers can be placed under a load balancer. As long as a single Secondary server is running, there will not be any user impact.
Primary Access
0SNet uses rsync in multiple stages to transfer the data reliably to the Secondary servers. This requires the SSH key of Primary to be authorized on the Secondary servers. To obtain the SSH public key of Primary, the following command should be run.
sudo 0snet --rsync key # Run on PRIMARY
The output of the above command needs to be added to /root/.ssh/authorized_keys on Secondary servers.
Initial Setup
Once 0SNet is installed on the Secondary servers, they should be configured using the command below,
sudo 0snet --rsync config <IP1>,<IP2>,... # Run on PRIMARY
To push the data to Secondary, the rsync command is as follows,
sudo 0snet --rsync users,login,certs,hosts <IP1>,<IP2>,...# Run on PRIMARY
Also, setup a cronjob to synchronize periodically. A sample cronjob is shown below,
0,30 * * * * root 0snet --rsync users,login,certs,hosts <IP1>,<IP2>,...
Secondary Configuration
On the Secondary servers, the following commands should be run,
sudo 0snet --opt authorigin any                           # Run on SECONDARY
sudo 0snet --rsync check on                               # Run on SECONDARY
sudo 0snet --letsencrypt mode off                         # Run on SECONDARY
sudo 0snet --license sync                                 # Run on SECONDARY
After running above commands, reboot the Secondary servers,
sudo systemctl reboot # Run on SECONDARY
NOTE: If you are using legacy configuration of hosts, you may need to copy /etc/hosts entries to Secondary servers
DNS Configuration
Once a load balancer is configured for the Secondary servers, the DNS entries can be made as shown below,
    *.corp.example.com    A    <Load-Balancer-IP>
0snet.corp.example.com    A    <Primary-IP>
TLS Configuration
If you are using the default Let's Encrypt integration, run the commands below to change to DNS mode.
sudo 0snet --letsencrypt mode dns                         # Run on PRIMARY
sudo 0snet --letsencrypt auto                             # Run on PRIMARY
sudo 0snet --reload                                       # Run on PRIMARY
Alternatively, you can add your own wildcard TLS certificate as follows,
sudo 0snet --letsencrypt mode off                         # Run on PRIMARY
sudo 0snet --act tlsconfig <key-path> <certificate-path>  # Run on PRIMARY
sudo 0snet --reload                                       # Run on PRIMARY
Once the above steps are completed, the system is highly available and additional Secondary servers can be added to horizontally scale the system.
Let's Encrypt
0SNet provides tools for easier integration with Let's Encrypt TLS certificate. It internally uses Certbot client to obtain and manage Let's Encrypt issued TLS certificates.
NOTE: This feature is intended for setups where 0SNet server has a public IP and the default HTTP port 80 is available. In case of private setups, or where port 80 is used by a different program, the necessary domain validation cannot be done to get certificates.
Certbot
Package for Certbot client is available on various distributions. On CentOS/RHEL 7.x, one can run the following command to install the EPEL repository,
sudo yum install epel-release
and install the certbot package,
sudo yum install certbot
In case, the client couldn't be installed through the native package manager, the following command can be used to download and install Certbot client.

The install of Certbot will be local to 0SNet. However, additional dependent packages will get installed, and/or upgraded, during the process. And, in case of any errors, you can attempt an experimental install with the option --debug, but make sure you have taken the necessary backups before using it.
Hosts
0SNet is intended to secure all subdomains of the chosen domain, such as *.example.com. But, since, Let's Encrypt platform currently supports only multi-domain TLS certificates (upto 100 domains) over HTTP-01 challenge, and not wildcards, the list of subdomains used will be gathered by parsing the /etc/hosts file. This list of subdomains can be verified by running the command shown below,

It should be ensured that all required subdomains are part of the list, before fetching the TLS certificate. On adding a new subdomain, a new TLS certificate should be obtained (fetch) and enabled (on).
Certificate
Let's Encrypt certificates are domain validated and are issued immediately. To obtain a new certificate, the fetch command should be run as follows,

During the process, 0SNet server will be stopped and started, with the service being offline for a few minutes.
Enable/Disable
A newly issued certificate is not automatically used by 0SNet. To enable Let's Encrypt certificate, the following command should be run,
sudo 0snet --letsencrypt on
And, to switch back to the previous certificate, ie., stop using Let's Encrypt certificate, run the command below,
sudo 0snet --letsencrypt off
Renewal
0SNet checks the certificate for renewal daily and it gets automatically renewed. During the renewal process, which happen once in 2-3 months, the server may be offline for a few minutes.
The log messages are written to syslog, and is typically available at /var/log/messages, it should be checked for any errors during renewal.
Contact Us
0SNet is a product of 0th Root Software Research. For any questions (or) suggestions, please write to us at support@0throot.com
We are located at,
(Primary Address)
RMZ Latitude Commercial,
10th Floor,
Bellary Rd, Hebbal,
Bengaluru - 560 024. (INDIA)
No.24, Tatia Nagar Phase -3,
Nolambur, Maduravoyal PO,
Chennai - 600 095. (INDIA)
+91 44 2653 2984